Description
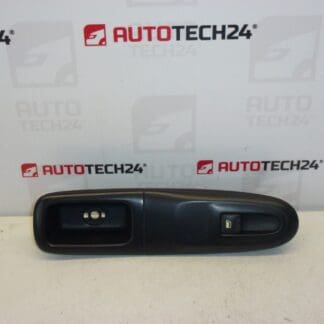
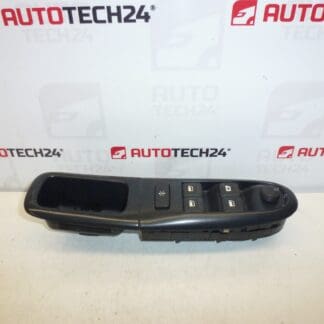
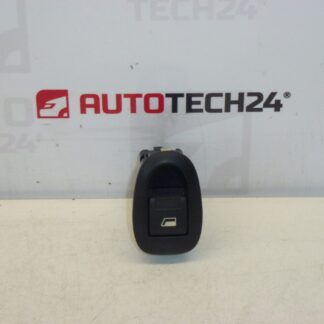
Rear window switch for Peugeot 406 and Citroën C3 and Pluriel
This Used Rear Window Switch is a direct-fit replacement for selected Peugeot and Citroën models. Designed to restore reliable control of the rear electric windows, it suits professional workshops and DIY mechanics who need a quick, cost-effective repair. The unit is commonly referenced under product code 6552ZG and matches original wiring connections for straightforward installation. Ideal for vehicles with intermittent window operation, unresponsive rear switches, or worn tactile feel at the rocker/button.
Technical Information
- Manufacturer: Stellantis (Citroën / Peugeot)
- Model: Peugeot 406; Citroën C3; Citroën C3 Pluriel
- Product Codes: 6552ZG
- Other Numbers: NFP
Function
The Rear Window Switch Sends The Driver Or Rear Passenger Input To The Window Motor And The Vehicle’S Body Control Electronics. It Provides Momentary Electrical Contact To Raise Or Lower The Window, Often Integrating Positioning Logic And Safety Features Such As Obstruction Detection When Combined With The Window Regulator Control System.
Common Symptoms And Diagnosis
- Rear Window Does Not Respond Or Operates Intermittently.
- Switch Feels Loose, Sticky, Or Has Lost Tactile Feedback.
- Window Moves Only In One Direction Or Requires Extra Pressure.
- Electrical Smell Or Burn Marks Around The Switch Area (Indicates Contact Failure Or Short).
- Simple Diagnostic Steps: Check Fuse And Wiring, Operate From Master Switch, Swap With Known Good Switch If Available.
Why This Part Fails Most Often
Failure Is Typically Caused By Wear Of The Internal Contacts Due To Frequent Use, Corrosion From Moisture Ingress, Dirt Or Debris Penetration Behind The Door Card, And Mechanical Damage To The Switch Housing. Electrical Overloads Or Short Circuits In The Window Motor Circuit Can Also Burn Contacts Over Time. Vehicles Exposed To Humid Climates Or Heavy Daily Use Are More Prone To Early Failures.
How To Replace
- Disconnect The Battery To Avoid Short Circuits And Unintended Airbag Or Electronic Actions.
- Remove The Door Trim Panel Carefully: Release Clips, Unscrew Fasteners, And Lift The Panel Away While Supporting It To Prevent Damage.
- Unplug The Electrical Connector From The Old Switch And Note Any Retaining Clips Or Alignment Tabs.
- Remove The Old Switch From Its Mounting (Often Held By Clips Or Screws) And Install The Replacement. Ensure Correct Orientation And Full Engagement Of Connectors.
- Reconnect The Battery, Test Window Operation From The Replaced Switch And From The Master Control Before Reassembling The Door Trim.
Installation Recommendations
Handle Connectors By The Housing, Not The Wires, To Prevent Terminal Damage. Inspect Connector Pins For Corrosion Or Bent Pins And Clean With Electrical Contact Cleaner If Needed. Do Not Force The Switch Into Place; Align Tabs First. Test All Functions (Up/Down, Child Lock If Applicable, And Master Control Interactions) Before Final Reassembly. If The Window Does Not Move After Installation, Verify Fuses, Wiring Continuity, And That The Window Motor Is Not Jammed.
Suitable For Professionals And DIY Mechanics
This Part Is Well Suited For Garages And Skilled Hobbyists Who Are Comfortable Removing Door Trim And Diagnosing Electrical Circuits. Keep Basic Tools, Trim Clips, And A Multimeter Handy For A Smooth Replacement. Ordering By Product Code 6552ZG Helps Ensure Faster Identification And Higher Chance Of Correct Fitment.
Restore Reliable Rear Window Operation Quickly — Add This Rear Window Switch To Your Cart Today.